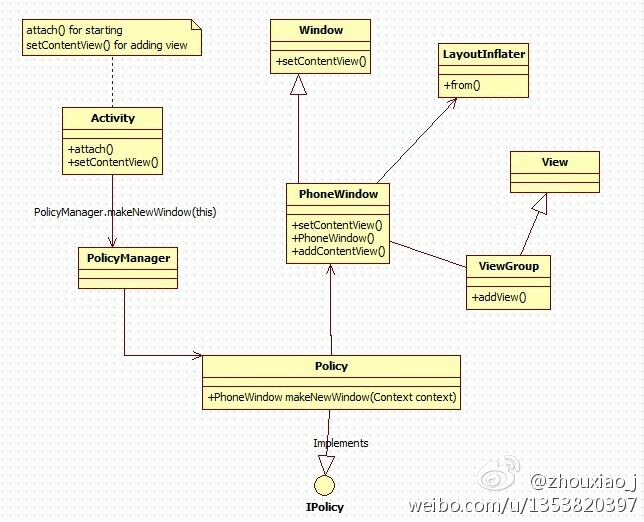
Activity、Window、View 的关系
源码
先在 Android SDK 中找到 Activity、Window、View 的源码文件
它们分别在
- Activity: android.app 包
- Window: android.view 包
- View: android.view 包
既然要知道它们有什么关系,那就从代码中看看互相是怎样引用的。
在 Activity 的源码中可以发现,全局定义了一个 Windows 对象,而且在一个叫 attach 的方法中进行了初始化。
1
2
3
4
5
6
7
8
9
10
11
12
13
14
15
16
17
18
19
| private Window mWindow;
...
final void attach(Context context, ActivityThread aThread,
Instrumentation instr, IBinder token, int ident,
Application application, Intent intent, ActivityInfo info,
CharSequence title, Activity parent, String id,
NonConfigurationInstances lastNonConfigurationInstances,
Configuration config, String referrer, IVoiceInteractor voiceInteractor,
Window window) {
...
mWindow = new PhoneWindow(this, window);
mWindow.setWindowControllerCallback(this);
mWindow.setCallback(this);
mWindow.setOnWindowDismissedCallback(this);
mWindow.getLayoutInflater().setPrivateFactory(this);
...
}
|
通过翻阅「 Android中Activity启动过程探究 」(太 TM 复杂了),Activity.attach 是在 android.app.ActivityThread.performLaunchActivity() 中调用的。
1
2
3
4
5
6
7
8
9
10
11
12
13
14
15
16
17
18
19
20
21
22
23
24
25
26
27
28
29
30
31
32
33
34
35
36
37
38
39
|
private Activity performLaunchActivity(ActivityClientRecord r, Intent customIntent) {
...
Activity activity = null;
try {
java.lang.ClassLoader cl = r.packageInfo.getClassLoader();
activity = mInstrumentation.newActivity(
cl, component.getClassName(), r.intent);
StrictMode.incrementExpectedActivityCount(activity.getClass());
r.intent.setExtrasClassLoader(cl);
if (r.state != null) {
r.state.setClassLoader(cl);
}
} catch (Exception e) {
if (!mInstrumentation.onException(activity, e)) {
throw new RuntimeException(
"Unable to instantiate activity " + component
+ ": " + e.toString(), e);
}
}
try {
...
if (activity != null) {
...
activity.attach(appContext, this, getInstrumentation(), r.token,
r.ident, app, r.intent, r.activityInfo, title, r.parent,
r.embeddedID, r.lastNonConfigurationInstances, config);
...
activity.mCalled = false;
mInstrumentation.callActivityOnCreate(activity, r.state);
...
}
...
}
...
}
|
回溯调用的它的方法,可以知道,实际上 ActivityThread.main 方法启动了 MainLooper , 也就是 App 的主 Looper。
1
2
3
4
5
6
7
8
9
10
11
12
13
14
15
16
17
18
19
20
21
22
23
24
25
26
27
28
29
30
31
32
33
34
| public static void main(String[] args) {
Trace.traceBegin(Trace.TRACE_TAG_ACTIVITY_MANAGER, "ActivityThreadMain");
SamplingProfilerIntegration.start();
CloseGuard.setEnabled(false);
Environment.initForCurrentUser();
EventLogger.setReporter(new EventLoggingReporter());
final File configDir = Environment.getUserConfigDirectory(UserHandle.myUserId());
TrustedCertificateStore.setDefaultUserDirectory(configDir);
Process.setArgV0("<pre-initialized>");
Looper.prepareMainLooper();
ActivityThread thread = new ActivityThread();
thread.attach(false);
if (sMainThreadHandler == null) {
sMainThreadHandler = thread.getHandler();
}
if (false) {
Looper.myLooper().setMessageLogging(new
LogPrinter(Log.DEBUG, "ActivityThread"));
}
Trace.traceEnd(Trace.TRACE_TAG_ACTIVITY_MANAGER);
Looper.loop();
throw new RuntimeException("Main thread loop unexpectedly exited");
}
|
了解 Looper 的童鞋都知道,它维护着一个 MessageQueue ,在一个无限循环体中不断的取出 Message ,通过 Handler 的 handleMessage 来处理。
1
2
3
4
5
6
7
8
9
10
11
12
13
14
15
16
17
18
19
20
21
22
23
24
25
26
27
28
29
30
31
32
33
34
35
36
37
38
39
|
public void handleMessage(Message msg) {
if (DEBUG_MESSAGES) Slog.v(TAG, ">>> handling: " + codeToString(msg.what));
switch (msg.what) {
case LAUNCH_ACTIVITY: {
Trace.traceBegin(Trace.TRACE_TAG_ACTIVITY_MANAGER, "activityStart");
final ActivityClientRecord r = (ActivityClientRecord) msg.obj;
r.packageInfo = getPackageInfoNoCheck(
r.activityInfo.applicationInfo, r.compatInfo);
handleLaunchActivity(r, null, "LAUNCH_ACTIVITY");
Trace.traceEnd(Trace.TRACE_TAG_ACTIVITY_MANAGER);
}
...
}
private void handleLaunchActivity(ActivityClientRecord r, Intent customIntent, String reason) {
unscheduleGcIdler();
mSomeActivitiesChanged = true;
if (r.profilerInfo != null) {
mProfiler.setProfiler(r.profilerInfo);
mProfiler.startProfiling();
}
handleConfigurationChanged(null, null);
if (localLOGV) Slog.v(
TAG, "Handling launch of " + r);
WindowManagerGlobal.initialize();
Activity a = performLaunchActivity(r, customIntent);
...
}
|
回到之前的 Activity.attach 方法,它执行完以后就该执行我们熟悉的 onCreate 方法了
在 onCreate 方法中调用了 setContentView 方法,查看父类方法 :
1
2
3
4
5
6
|
public void setContentView(@LayoutRes int layoutResID) {
        getWindow().setContentView(layoutResID);
        initWindowDecorActionBar();
    }
|
而我们知道 Activity 中的 Window 实际是一个 PhoneWindow 对象,所以调用的是 PhoneWindow.setContentView 方法
1
2
3
4
5
6
7
8
9
10
11
12
13
14
15
16
17
18
19
20
21
22
23
24
25
26
|
@Override
public void setContentView(int layoutResID) {
if (mContentParent == null) {
installDecor();
} else if (!hasFeature(FEATURE_CONTENT_TRANSITIONS)) {
mContentParent.removeAllViews();
}
if (hasFeature(FEATURE_CONTENT_TRANSITIONS)) {
final Scene newScene = Scene.getSceneForLayout(mContentParent, layoutResID,
getContext());
transitionTo(newScene);
} else {
mLayoutInflater.inflate(layoutResID, mContentParent);
}
mContentParent.requestApplyInsets();
final Callback cb = getCallback();
if (cb != null && !isDestroyed()) {
cb.onContentChanged();
}
mContentParentExplicitlySet = true;
}
|
可以传进来的 layoutResID 会被填充到 Window 的根部局当中。
关于 DecorView 可以看这篇文章「Android DecorView浅析」。
总结
至此,我们大概知道了三者的关系,Activity 中维护一个 Window 对象,通过 setContentView 将 View 设置给 Window。Activity 就像一个控制单元,负责 Window 与 View 的连接;Window 就是一个视窗,负责显示 View 的内容。
写在最后
Android 源码是一个庞大的工程,而且它本身也在不断的迭代,仅仅想了解这三者的关系却发现涉及到的知识远远不止这些,所以我在写这篇文章的时候也很吃力,总是想着要不要等我吃透了再来写。仔细想了想,做技术博客这件事本来就是为了自己写文章,使得对知识的印象加深,更助于理解。有一句话叫 Output is input(输出既是输入)。所以如果我不写文章,可能我永远无法学会这些东西,以至于陷入一个死循环。
于是还是决定写一篇是一篇,文章中肯定会有因为我理解浅薄而说的不对,或者偏差的地方,但这也不影响我后续的学习,等到以后了解的越来越深入,我也会对学过的东西进行更正。这样应该是一个不错的学习方式。
参考
Android中Activity,View,Window之间的关系
Android DecorView浅析
Android中Activity启动过程探究